


⬇️ Rample Quickstart PDF – French 🇫🇷 ⬇️ Rample Quickstart PDF – Japanese 🇯🇵
A kit is a group of 4 samples.
- A0 to A99
- B0 to B99
- ...
- Z0 to Z99
Rotate the encoder to display the current kit and to select a kit, and load it by pressing the encoder.


You can only scroll through created kits inside the SD card. For example, if the kit folder A34 does not exist, it will not appears in the list.
Tip Fast scroll (bank select): hold assign and rotate the encoder.
Tip When scrolling through kits, pressing ① ② ③ or ④ will display the name of the sample on the screen.
Tip To load a kit samples while keeping the FX parameters values of the previously playing kit, scroll to select the kit, hold assign and press the encoder.
There are 4 voices: audio outputs SP1, SP2, SP3 and SP4.
If a voice includes more than 1 samples, this voice use the "multi–layers" feature. Each kit folder can includes up to 12 layers (.wav sample files) per voice. On the example below, SP1, SP2 and SP3 are using layers.


Use the gate input 1 to play SP1 (sample 1), gate input 2 to play SP2, gate input 3 to play SP3, gate input 4 to play SP4.
You can see the samples playing on the screen, thanks to the 4 vu–meters:


Each sample is always outputted on its dedicated audio output (1, 2, 3, 4). If these audio outputs are unplugged, they are normalled to the "mix" output.
To listen a sample without triggering it via the Gate inputs or the MIDI input, hold listen and press the mode buttons ① ② ③ or ④.
Double press listen to stop all samples.
How to Assign a CV input:
- press assign
- select the desired CV input (1, 2, 3 or 4)
- select the sample you want to control (SP1, SP2, SP3, SP4, All Samples)
- select the effect/parameter to assign: Pitch, Bits, Filter, Freeze, Start, Length, Env, Run, Levels/drive, Layers, T–F (trig freeze), V/oct.
V/OCTAVE PITCH CONTROL
Instead of assigning a CV input to Linear Pitch (–5V = –50%, 0V = 0%, +5V = +100%), you can use the standard V/octave format to control sample pitch with chromatically quantized notes.
Note Rample CV inputs operate over a range of –5V to +5V (a total of 10 octaves). However, each sample can only be pitched across 2 octaves (24 semitones). This ensures consistent note selection while working within the available pitch range. For this reason, Rample uses a “modulo V/octave” rule:
● The 24 available notes (2 octaves) are wrapped cyclically across the full –5V to +5V range.
● You will always obtain the correct chromatically quantized note.
● However, the octave position will wrap around and may jump when exceeding the 2-octave range.


Tip When a cv input is assigned to "V/oct", it's possible to fine tune the voice pitch with the potentiometer (or with an other CV input assigned to pitch).
Let's take a few examples:
- SP1 muted by SP2
hold assign , press ①, ②, release assign - SP2 muted by SP1 + SP4
hold assign , press ②, ① , ④, release assign - Delete SP1 mute group
hold assign , press ①, release assign


Press once again ① ② ③ or ④ to enter the per voice layer playback mode (manual, random, cyclic, ...) of the currently selected voice.
Tip If the LAYERS setting is set to MANUAL, you can manually select the layer with the main encoder. Press the encoder to listen to the selected layer while scrolling through them.
We advise to use only the provided microSD card, as its fastness is fundamental for Rample optimal playback. We do not guarantee Rample stability with other cards.


If you see this pixel blinking on the screen, or you are hearing glitchy/noisy sounds, your SD card may need to be formatted.


If you need to reformat your SD card, we strongly recommend using the official SD Memory Card Formatter from the SD Association, as it can improve the card’s performance compared to other formatting tools.
Tip It is recommended to often format an SD card to preserve the integrity of the file system. This can also help improve Rample’s responsiveness and reduce latency.
The original Rample Sample Pack is available on the following web page: RampleTurbo.
Each potentiometer controls the selected effect amount, per voice. potentiometer 1 will always control SP1, potentiometer 2 will control SP2, ...
Rotate a potentiometer (or select an effect with ① ② ③ or ④) to display the '4–voice effect values' view:


A great sounding resample engine, based on a 6–pole interpolator. The range goes from –1 octave to +1 octave.
To select this effect, press ①.


Increasing speed → higher pitch + shorter duration.
Decreasing speed → lower pitch + longer duration.
Two different bitcrushing algorithms, based on sample rate reduction and resolution reduction. It produces distortion and warms up the audio signal.
To select this effect, press ②.


A low resonance filter, DJ–style, cutting off the high frequencies (low pass) or the low frequencies (high pass).
To select this effect, press ③.


When enabled (potentiometer ≠ midpoint), Rample samples and loops a portion of the currently playing waveform, creating a repeat or glitch effect.
To select this effect, press ④.


Counter-clockwise Freeze (algo 1): captures a short audio snippet and loops it in a ping–pong style.
Clockwise Freeze (algo 2): captures a longer audio snippet and calculates a loop length as a fraction of the original sample length. At low freeze amounts (slightly turning the encoder), the loop synchronizes with the original sample—ideal for rhythmic loops. Turning the encoder further reduces the loop size, creating a more glitchy effect, approaching the behavior of a single-grain granulator.
Note You can activate/deactivacte the freeze independently of the amount, by assigning a CV input to T-F (Trig Treeze) and send a Gate to Rample to freeze your sample.
Turn the knob to the left to decrease the voice gain, or turn to the right to drive the signal.
To select this effect, hold assign and press listen .


Drive: from 0% to 50% on the potentiometer, the Drive control increases clean gain. From 50% to 100%, additional gain is applied along with a warm, analog-style saturation for added character.
Reduces the dynamic range of the signal by attenuating loud sounds and enhancing quieter ones. It is commonly used to control peaks, add punch, increase sustain, or glue elements together in a mix.
The Rample Compressor offers multiple preset models (Glue, Peak Limiter, Slow Opto, Drum Transient, Punchy VCA, Leveling Amp, Parallel, Aggressive Limiter FET and Mastering) as well as an amount (0 to 200%).
This master Compressor process each voice individually, delivering an independent compressed sound on outputs SP1, SP2, SP3 and SP4.
To enable the Compressor, configure Settings → % Compress (set amount more than 0%).
Settings → Compress lets you set the preset.
Settings → Sidechain lets you choose one input (SP1–SP4) as the control source for the compressor. This selected source is used only to drive the compression envelope and is not affected by gain reduction. The remaining three inputs are compressed together and will be ducked in response to the sidechain source. By default, the sidechain feature is disabled.
Note The Compressor parameters (Compress, % Compress, and Sidechain) are saved as part of your settings.
Applies an LFO to the sample playback speed. Additional randomization is applied to both frequency and amplitude, creating a vintage tape–style effect similar to a cassette simulator (also called Wow, Wobble or Flutter effect).
Settings → Tape (0–127) acts as a macro that sweeps through multiple combinations of LFO frequency and depth, controlling the amount of detune.
Note The Tape amount is saved as part of your settings.
Double tap �① ② ③ or ④ to select start point, length, env or run mode.
If setting SLICER = EXP, the start point goes from 0% to 100% of the sample total length. If SLICER is set to a value (/8, /16, /32, /64, /128, /12, /24, /48), the sample length is divided by this value into equal parts, handy to edit the start point of your sample 'in beats'.


● env — turn the knob to the left to add sample attack,
or turn to the right to add sample decay.


– one shot: a trig plays the sample entirely
– toggle loop: a trig alternatively plays/stops the sample
– gate high only: sample played only when gate is high


Hold ① ② �③ or ④ to access the effect in Momentary Mode. While holding, you can play with an effect parameter knob to change the sound, however the effect will be set back to its original value after releasing ① ② ③ or ④.
In Momentary Mode, turning the main encoder will affect all four voices. Releasing ① ② ③ ④ will not apply the changes, but pressing the encoder before releasing will applies the momentary parameters.
Tip Double–press ① ② ③ or ④ and keep holding the second press to enable Momentary Mode on Advanced parameters.
Tip When using the encoder, you can hold multiple buttons and rotate the encoder to change multiple effects at the same time. For example, hold both ① and ② to pitch and bitcrush your 4 samples.
When Settings → Punch is enabled, it changes how listen + ① ② ③ ④ buttons behave. It’s a new way to play with effects live. Two performative modes are available:
FX – Holding listen + button ① ② ③ or ④ temporarily activates the selected effect (① Pitch, ② Bits, ③ Filter, ④ Freeze) across all samples. When no buttons are pressed, no effects are applied.
VOICE FX – Holding listen + Button ① ② ③ or ④ temporarily activates the selected voice’s (SP①, SP②, SP③ or SP④) effects. When no buttons are pressed, no effects are applied.
Note In both modes, effects will only trigger on voices that have a positive or negative amount set for that effect.
You can hold listen and hold multiple buttons (for example ①+②+③) to punch multiple effects.
Tip MIDI CC messages are available to externaly control or sequence this feature.
Using 'start points' and 'length' parameters is a great way to slice your samples and play a controlled part of the waveform:
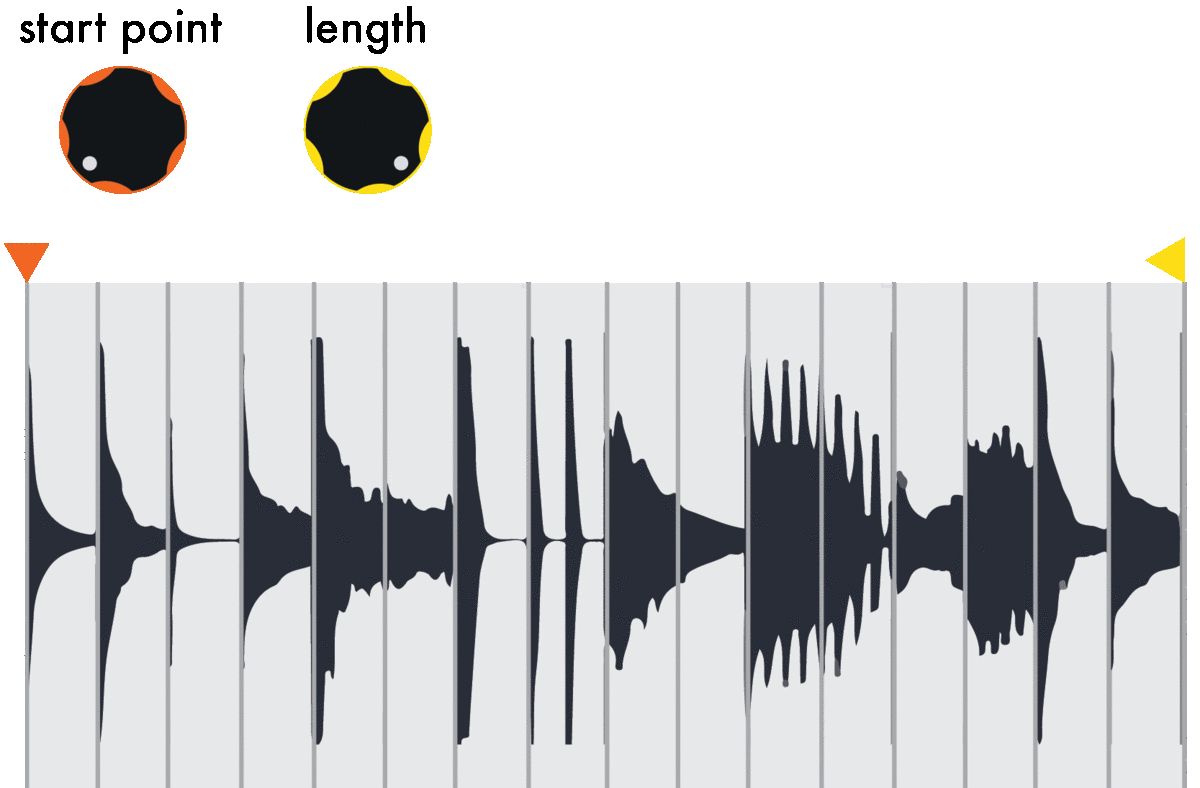
The example above shows a sample divided into 16 equal parts (setting SLICER = /16). With the SLICER setting, it's possible to increase/decrease this number of equal parts. Awesome when playing with drum loops or organized samples in a single .wav file!
The example below shows a sample divided into 256 parts (setting SLICER = EXP), allowing more precise START and LENGTH fine-tuning on low values. It's possible to get very short sample LENGTH to create fast or glitched sounds.


Tip Set ANTICLIC = OFF to get a tighter sound, especially when slicing drum loops (anticlic introduces a volume fade out and can be perceived as jitter).
Go to Settings → SP1 (or SP2, SP3, SP4) and scroll right to the end. Select the midi range (note number range) that your keyboard will control:
0 12 24
12 24 36
24 36 48
36 48 60
48 60 72
60 72 84
72 84 96
84 96 108
96 108 120
You can see it as a keyboard split, that allows to play samples as chromatic notes, on a range of 2 octaves (corresponding to pitch –50% to +100%).
For example, if you set SP1 = 48 60 72, your midi keyboard will play SP1 across 2 octaves:
the midi note 48 (C–1) will pitch the sample one octave below,
the midi note 60 (C) will trig with no pitch change,
the midi note 72 (C+1) will pitch one octave above:


Second example, if you set SP1 = 36 48 60 and SP2 = 60 72 84, your midi keyboard will be split into 2 parts:


Tip It's great to play with piano/synthesizer samples that have been captured in C, so the C key of your midi keyboard will correspond to the C note of the sample.
As each of your 4 samples can be set to a different range or to a simple midi note, it allows a great flexibility for midi mapping.
CHORD MIDI MODE
Turns your Rample in a 4–voice polyphonic synth!
In the Settings, if your voices share the same octave range, they will play in CHORD MODE, in a voice–stealing way.
For example, set SP1 = 48 60 72 = SP2 = SP3 = SP4, then play up to 4–note chords with your keyboard!


Tip To mimic a synthesizer, create your own folder kit with a synthesizer sample (e.g. a C note) for each of the 4 voices, so the sound will be the same, only the note pitch will change (and you can still add Rample's FX/parameters for each independent voices).
Tip With the midi in setting, you can even set 2 or 3 voices sharing the octave range in order to play them like a synthesizer, and set the other voices to a simple midi note (eg to trig a kick/snare).
Go to Settings → SP1 (or SP2, SP3, SP4) and scroll right to the very end. Select the midi range (note number range) that your keyboard will control:
0 ► 11 (note 0 selects Layer 1, note 11 selects Layer 12)
12 ► 23 (note 12 selects Layer 1, note 23 selects Layer 12)
24 ► 35
36 ► 47
48 ► 59
60 ► 71
72 ► 83
84 ► 95
96 ► 107
108 ► 119
This mapping makes it easy to play all layers of a kit across the MIDI keyboard: if each voice is assigned to a range, you will get under your hands all the 48 layers of Rample, without needing to select the layer via a CC or other method.


Inside the SD card, each kit must be in a folder named ?X where:
? is the bank letter, from A to Z (handy for organizing your samples)
X is the number of the kit, from 0 to 99
For example, a kit folder can be nammed A0, E10, R7, G69, Z99, ... Up to 2600 folders can be created!
In a folder, drop your favorite samples. The first character must be the number of the voice, from 1 to 4 (voice 1 to voice 4). For clearer file names and easy sorting, you can add any text after the digit, as per the figure below :


These files must be in a standard .wav mono format, 16–bit or 8–bit, 44100 Hz, minimum length 50ms. There is no size or duration limits, you can even play hours–long samples.
Note A kit folder must include at least the voice 1 sample (a valid .wav file starting with '1'). Otherwise, you will not be allowed to open this kit.
STEREO SUPPORT
You can drop stereo samples in your kits. Rules are the same as for mono samples. A stereo sample will fill 2 mono voices.


Tip Most wave file editor software should works (like Ableton or MediaHuman converter).
Important: all your kit folders must be located on the root of the SD card! If no kits are added, Rample will display 'NO K'.


These layers can be played manualy, randomly (by default), Round–Robin (cyclic), or controlled by velocity midi in.
Tip MANUAL layer mode allows you to choose which layer you want to play. Press assign then press ① ② ③ or ④ to enter the layers mode. Scroll among them using the main encoder.
The following example shows SP1 with 5 layers, SP2 with 2 layers, SP3 and SP4 with only one layer :


Sample layer names are numerically and alphabetically sorted in Rample, handy to create a special order when controlling the layers with midi velocity or CV (first samples are triggered by lowest velocities).
Tip Stereo samples can also be layered. All layers must be of the same type (mono OR stereo) in a voice.
It works fully offline in your browser and automates the repetitive parts of kit preparation: batch import for layers, format conversion, mono/stereo mode, renaming, and slot organization.


This tool was developed independently by Bálint Zalkai, and while it is not an official Squarp instruments product, we find it extremely helpful in their workflow.
You can access Ramplaid here: RAMPLAID.COM
A big thank you to its creator for contributing to the Rample ecosystem and helping the community get the most out of the module.
RESET
Reset all effect parameters to default.
RANDOM
Randomize effect values.
COPY
Copy all parameters & assignments.
PASTE
Paste the copied parameters & assignments.
STORE
Save current kit parameters & assignments on the SD card.
CHANNEL
Set the input midi channel of this unit.
SP1, SP2, SP3, SP4
Set the midi note 0..127 (C0 to G10) to trigger the selected sample (or set the Chromatic MIDI Keyboard Split, or set the Layer Keyboard Split).
VELOCITY
Assign the midi in note velocity to LEVEL, PITCH, BIT or FILTER.
BEND
Assign the midi in pitchbend to:
– ALL LEVEL, SP1..SP4 LEVEL,
– ALL PITCH, SP1..SP4 PITCH,
– ALL BITS, SP1..SP4 BITS,
– ALL FILTER, SP1..SP4 FILTER,
– ALL FREEZE, SP1..SP4 FREEZE
PROGRAM CHANGE
Enable midi in PC to change the kit number.
CV IN
The input voltage range, 0V to 5V or -5V to 5V.
PITCH
Enable/disable pitch CHROMATIC notes quantizing (this setting affects the pitch FX value when controlled with the potentiometer, or when a CV input is assigned to "pitch").
SLICER
Set the samples START POINT and samples LENGTH quantizing method. See Advanced parameters chapter for more info.
LAYER
Set the default layer mode: MANUAL, RANDOM, CYCLIC, REVERSE CYCLIC, VELOCITY. After a kit load, if the kit has never been saved before with STORE, all voices will be set to this default mode.
ASSIGN
Set the 4x CV inputs to be assigned per KIT, or GLOBAL assign (all kits will share the same allocation).
ANTICLIC
Enable or disable the fast volume envelope designed to prevent clics on sample start/stop.
VUMETER
Change the vumeter style:
OFF – Always display the four-parameter levels.
CLASSIC – Each voice has its own level meter.
WAVES – Similar to Classic, but with a rolling/oscilloscope-style display.
PRO – Displays averaged audio levels across 15 steps for better volume accuracy.
PEAK – Displays the maximum audio levels, best for level monitoring.
MIX – Shows all voices combined, displaying the recent signal history.
BLAST – A dynamic, animated visualization for a striking effect.
LAYERS – Displays four horizontal lines, each representing a voice layer.
PLAYHEADS – Each line represents sample playback progress.
CV IN – Each block represents the CV voltage of inputs 1, 2, 3, and 4.
% CPU – Displays real–time CPU usage across all 70 pixels.
FLIP
Rotate the screen, useful if you want to flip your Rample in your case.
AUTOSAVE
Enables/Disables the "autosave kit" feature. When this is on, Rample will remember the last kit you used, and use it again at power–up.
TAPE
Tape (master effect) amount.
COMPRESS, % COMPRESS, SIDECHAIN
Compressor (master effect) configuration.
SAVE SETTINGS
Save current Settings on the SD card.
INFO
Display the running OS version. Scroll right and you will see the amount (%) of CPU used, and the max amount of CPU used.
Midi messages are ignored when not matching the midi channel of Rample (to be defined in the Settings).


