02 Screen
03 Pads
04 Mute/unmute tracks on the fly
05 Mute/unmute tracks to create sequences
06 Track options
07 Solo a track
08 Midi channel
09 Zoom
10 Length
11 Copy/paste/delete a track
12 How to use PATTERNS
13 Time signature and polyrhythm
14 Track length fraction and polymetry
15 Irrational rhythms (advanced users)
16 DISP track view
17 Microstep track

The Track Mode has four purposes:
1 to configure the current track (midi channel, zoom, length, time signature) using the shortcuts before playing in Live Mode or programming in Step Mode.
2 to mute/unmute the 64 tracks using the 16 pads and < > . This tactile, intuitive method allows you to perform your song on the fly.
3 to manage your track PATTERNS.
4 to build your current sequence (a set of the 64 muted/unmuted tracks).
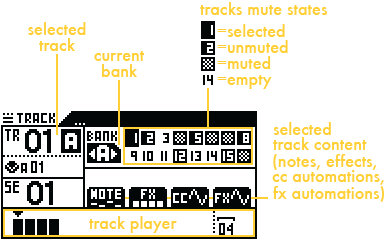
This display shows that TR01A is selected (current track) and contains notes, effects, CC automations and FX automations.
Sequence SE01 groups 6 unmuted tracks of bank A: TR01A, TR02A, TR05A, TR08A, TR12A and TR15A. The other tracks are muted or empty.
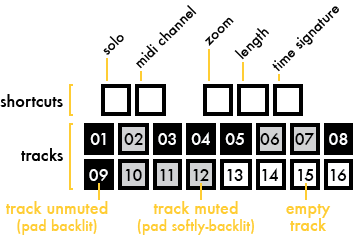

An empty track (without notes, effects or automations) can't be muted.
When the sequencer is playing, tracks evole in parallel even if they are muted: it enhances your ability to perform with them.
In the example below, 3 tracks are unmuted, 2 tracks are muted and all tracks have the same length:
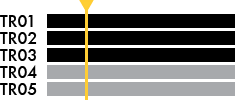
Tracks of different lengths are played simultaneously; shorter tracks will repeat before the others:

Tip Use different track lengths (for example 2 bars, 4 bars and 6 bars) to create a non-repetitive, evolving sequence.
Mute/unmute changes are in sync, depending on the PERFORM type selected in SEQ mode:


For example, if you unmute the track 01, this track will be activated at the beginning of the next bar (if PERFORM = 1BAR in SEQ mode). This allows you to play tracks by changing mute states in perfect sync.
To mute/unmute tracks instantly, select PERFORM = INST in SEQ mode.
Tip SETTINGS > MISC > TRACKMUTE DELAY allows you to specify that tracks mute/unmute in sync by selecting ”SEQ PERFORM” or mute/unmute instantly by selecting ”INST”


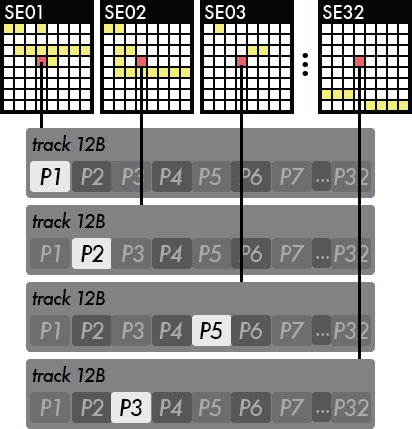
For example in SE01, only TR02A is unmuted. In SE02, TR02A and TR11A are unmuted. In SE03, TR01A, TR06A and TR15A are unmuted:
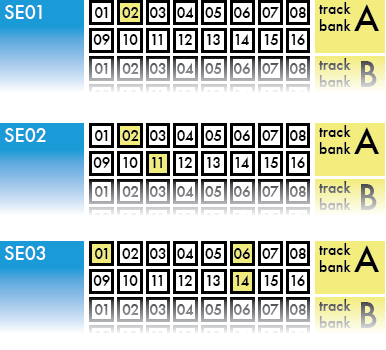
Once you have created your sequences, jump in Seq Mode to launch them, or program a chain of sequences to create a complete structured song.


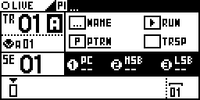
Click NAME to name your track:
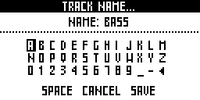
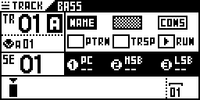
Each of the 64 tracks can be named.
On any track, you can "call" an instrument (defined in the .txt file). It will auto-set the track name, the track channel and the track output.
To know how to use this feature, please refer to the section Call an instrument.
On any track, you can "consolidate" the effects, in order to write down the notes + CC messages computed. When you consolidate a track, it will consolidate all its patterns. After the consolidate, all the effects will be removed.
You can even consolidate an euclidean track, in order to get the euclid pattern inside the classic stepmode NOTE.
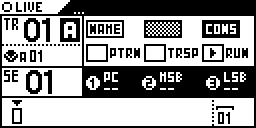
To consolidate a track, click CONS:
Then select the destination track with the menu encoder (can be the current track, or an empty track):
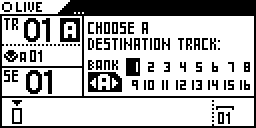
If you select the current track, this track will be definitely deleted and renewed with its consolidate version.
Click RUN to set the track run mode:
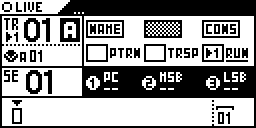
See "Track run modes: FREE, RELATCH & TRIG"
Click TRSP to enable/disable track transpose:
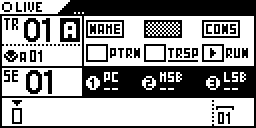
Set if the track can be transposed in real time with a MASTER TRANSPOSE track (see "Midi Channel"). You can also transpose this track with an external keyboard (when SETTINGS > MIDI IN > ASSIGN NOTE TO = MASTER TRANSPOSE).
Click PTRN to enable/disable PATTERNS on this track:
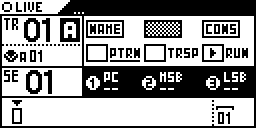
Each track can include up to 32 patterns (variation of notes, CC automation, FX automation, euclidean engine).
Rotate encoder 1 to set the track PROGRAM CHANGE, rotate encoder 2 to set the track BANK MSB, rotate encoder 3 to set the track BANK LSB:
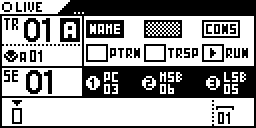
Each track and each pattern can have its own PC and BANK.

To cancel solo, press any track

Each midi output provides 16 channels, which means that you can control up to 16 electronic musical instruments per midi output.
Hold channel and rotate


A message pops up, displaying the selected output type (CV, MIDI A, MIDI B, USB) and channel number:

You can link the track to two different outputs, for example both MIDI A and MIDI B or CV and USB.


The output channel is always displayed under the track number.
Tip While channel is pressed:
● rotate encoder 1 to set the CV/GATE output
● rotate encoder 2 to set the MIDI A channel
● rotate encoder 3 to set the MIDI B channel
● rotate encoder 4 to set the USB channel
● rotate encoder 5 to set MASTER TRANSPOSE
Note: DIN sync output (also called SYNC24) is available on the MIDI port B. You can enable and configure it using the Settings menu.


● x1 zoom: 1 step = quarter note
● x2 zoom: 1 step = eighth note
● x4 zoom: 1 step = sixteenth note (default)
● x8 zoom: 1 step = thirty-second note
● x16 zoom: 1 step = sixty-four note (useful to surgically edit your track ).
You can also set lower resolutions to have a global view of your track:
● /2 zoom: 1 step = half note
● /4 zoom: 1 step = whole note
Tip While zoom is pressed: press a pad (from 01 to 07) to set the track zoom (from /4 to x16).
Note: please read the Step Mode section "Track player: pages, zoom and length" for further details about the zoom feature.


A length of 4 bars = 64 steps in x4 zoom

A length of 64 bars = 1024 steps in x4 zoom


A length of 2 bars + 1 quarternote = 36 steps in x4 zoom

A length of 0 bar + 1 quarternote = 4 steps in x4 zoom
Tip Bear in mind that you can, in every mode, hold TRACK to activate the following shortcuts:
solo
midi channel
zoom
length
time signature

Press 2ND + paste + a track

Press 2ND + delete + a track

A pattern is a track variation. In each track, you can create up to 32 patterns (from P1 to P32):
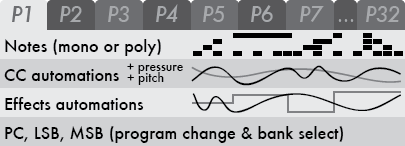
Each pattern includes its own notes, CC automation, FX automation and euclidean engine. A pattern can also have its own length, time signature, run mode, and default PC/BANK message.


Now you can fill your track patterns with notes and automation, change each pattern length, time signature and run mode. Track's effects (for e.g. quantizer, swing, arp, ...) will affect all patterns of the track.
To enter the trackmode PATTERNS, press STEP + TRACK:
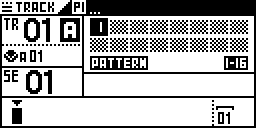
This track has 1 pattern. P1 is now playing and includes only notes.
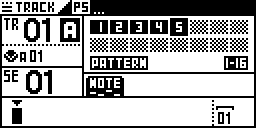
This track has 6 patterns. P5 is now playing and includes notes and CC automation.


Display patterns page 1-16 or 17-32 with < or > .

Press 2ND + copy + a pattern

Press 2ND + paste + a pattern

To exit the trackmode PATTERNS, simply select an other mode.

Create cross-rhythms and pattern variations! The 4/4 standard time signature often sounds good, but sequencing with other time signatures is an easy way to add complexity and originality to your songs.
In SETTINGS > MISC > SIGNATURE, you can choose how your track time signature will be interpreted by Pyramid: either Polyrhythms (default) or Polymeters.
● If Polyrhythms is selected, Pyramid apply true polyrhythms when different time signatures are used. If you select a 3:4 time signature you will have bars of 3 quarter notes, but the bar will have the same duration as a 4/4 bar. The bar size is the same, but the beat differs.
● If Polymeters is selected, all quarter notes remain the same. If you select a 3/4 time signature you will have bars of 3 quarter notes, and each quarter note will have the same length than the 4/4 ones. The length of the bar differ, but the beat unit remains the same. The polymetric mode is easier to understand than the Polyrhythmic one because it doesn't mix several speeds.
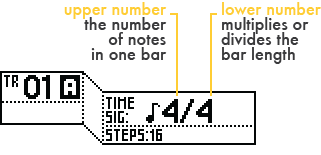


The length of a bar is the same whether you set a common 4/4 signature or you choose an odd one such as 15:4. For example, at 120 bpm, a bar in 4/4, 3:4 or 15:4 will last 2 seconds, and all tracks will loop at the same time:

The difference is the length of each note. If you increase the time signature's upper number, it will increase the number of beat in one bar: 4/4 means 4 quarternotes in a bar, 15:4 means 15 quarternotes in a bar.


You can adjust the track’s length to 4 bars to achieve a 7:4 time signature (28 quarter notes) or any other track length you choose (for example 2 bars + 2/7ths quarter notes).
Polyrhythms signature can also be seen as a way to create tracks with different BPM speeds.
With this setting, all quarter notes will remain the same as a 4/4 beat, but the length of your loop will be different. Your loops will shift against each other as they play: this is polymetry!
In other words, the length of the bar differ, but the beat unit remains the same.

• The 1st track is a standard 4/4 bar
• The 2nd track is a 3/4 bar (3 quarter notes)
• The 3rd track is a 5/4 bar (5 quarter notes)


Changing the length of a track is an other way to create polymeters.
Hold length and press + rotate

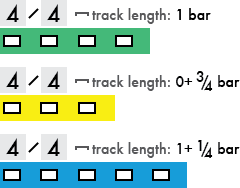
• The 1st track is a standard 4/4 bar
• The 2nd track is a 4/4 bar with 1 quarter note removed
• The 3rd track is a 4/4 bar with 1 quarter note added
The length of your loops are different, so they shift against each other as they play. The length of the bar differ, but the beat unit remains the same.
Using polymetric tracks is a good trick to create lively, ever-changing and lengthy sequences. In the following example, the sequence composed of 3 short tracks will get back to its starting point after 15 loops of the standard 4/4 track:

Tip Link these 3 tracks to the same midi channel (ie to a unique musical instrument) to create a progressive pattern.
Create a polyrhythmic (tracks with different time signatures) and polymetric (tracks with different bar lengths) sequence to experiment irrational rhythms! Both the measure size and the beat differ.
In the example below you get a simple overview of all these concepts for 3 simple tracks:
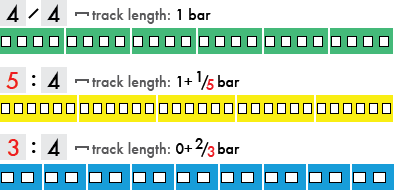
This sequence will get back to its starting point after 6 loops of the 4/4 track. Within the sequence, track quarternotes are never on time because of the beat phase shift.
Press DISP to display your tracks progressions and easily understand your track polymeters:
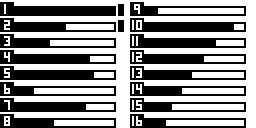
This screen displays:
● Track number: from 1 to 16
● Track progression: percentage of the loop being played
● Output: flashes if the track is sending events via MIDI, USB or CV/GATE.
Muted tracks are shaded:
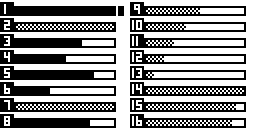
The DISP view displays tracks from TR01 to TR16 of the selected bank.
With DISP activated, the 16 pads flashes when tracks send midi events (notes and CC messages).
To create a Microstep track, set the track length on 0+1/4 bar, the zoom on 1600% and increase the time signature lower number up to 4/16. The step-by-step player will run at high speed, which is very useful to create drones, black midi and glitch sounds, and to expand the boundaries of your instruments.


